Maintaining your vehicle battery is important, and being able to read a battery charger amp meter can help.
During a battery’s working life, it may sometimes need to be charged. If you store your vehicle or if you don’t start it for a long time, the battery will lose some of its charge.
The battery charger amp meter can give you valuable information about your battery’s condition. It can also help you to diagnose some battery-related problems.
How Do You Read a Battery Charger Amp Meter
How to connect a battery charger
Before we can use the amp meter on the battery charger, we first need to connect the charger to your battery. That seems simple enough, but there are some precautions you need to take. The steps below are the safest method for connecting your battery charger:
Step 1: Make sure the battery terminals are clean. While the battery is fitted to your car, it will get covered in road grime. So check these are clean first.
Step 2: Make sure you are in a well-ventilated area. Batteries give off hydrogen gas, which is explosive.
Step 3: The battery contains acid. We recommend you wear eye protection and gloves while working on your battery.
Step 4: If the battery is fitted to the car, make sure you turn everything off. Things such as the radio and interior lights.
Step 5: Identify the positive and negative battery terminals. Positive is red and negative is black.
Step 6: Connect the red cable from the charger to the positive red battery terminal.
Step 7: When you connect with the black terminal, it may cause a spark. This could ignite any hydrogen gas in the air that has come from the battery. For this reason, it is safer to connect the black terminal a distance away from the battery:
- If the battery is fitted to the car, connect the black cable from the charger to the engine block or part of the chassis. Look for a site well away from the battery.
- If the battery is removed from the car, connect a two-foot piece of battery cable to the negative terminal. Then connect the charger black cable to this, again well away from the battery.
Step 8: Now you can switch on the charger and check the amp meter.
The meaning of the numbers on the amp meter’s display board
The amp meter on your battery charger has several sets of numbers. Let’s go through the gauge shown in the images below, one at a time.
Charge Rate
At the bottom of the meter is the charge rate. The numbers shown will depend on your battery charger. In the image above, they represent the number of amps flowing into the battery between zero and twelve.
Percent Charged
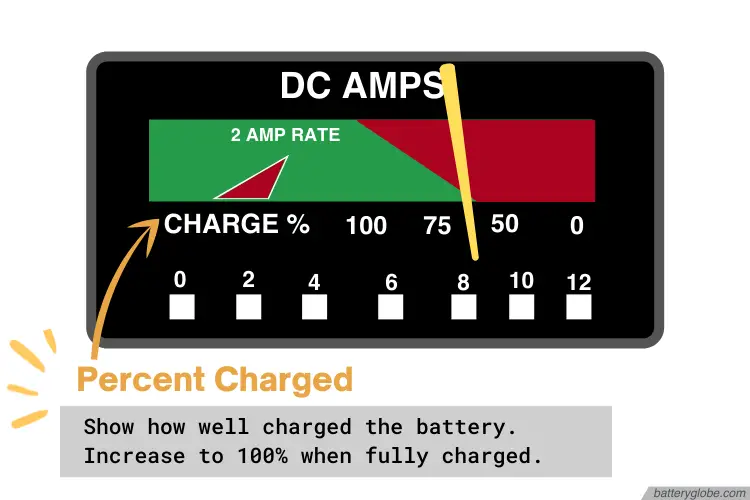
Above the amp scale is the percent charged scale, showing how well charged your battery is. As the battery becomes charged, the needle moves from right to left. This shows a reduction in the number of amps flowing, and an increase in percent charged.
The charge% row the needle is at about 60% telling you the battery is about 60% charged and eventually the needle should go to the left when looking at it near 100% charged or drawing almost zero amps.
InsertBluescreenHere
Red and Green Areas
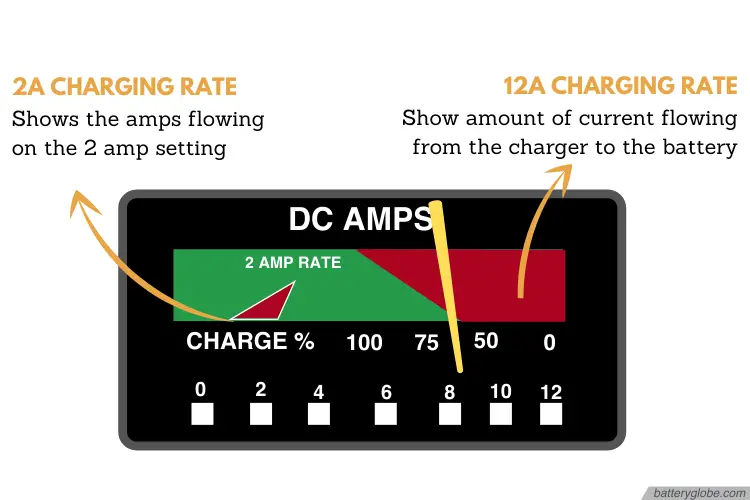
The image above relates to a charger with two charging rates: 2 amp and 12 amp.
12 Amp Charging Current:
The large red right trapezoid shows the amount of current (amps) flowing from the charger to the battery. As it charges the battery, the flow rate decreases.
The needle moves to the left, and into the green area. When the battery is fully charged it will indicate around 6 amps.
2 Amp Charging Current:
The small red triangle shows the amps flowing on the 2 amp setting. Again, the needle moves to the left as the battery becomes charged.
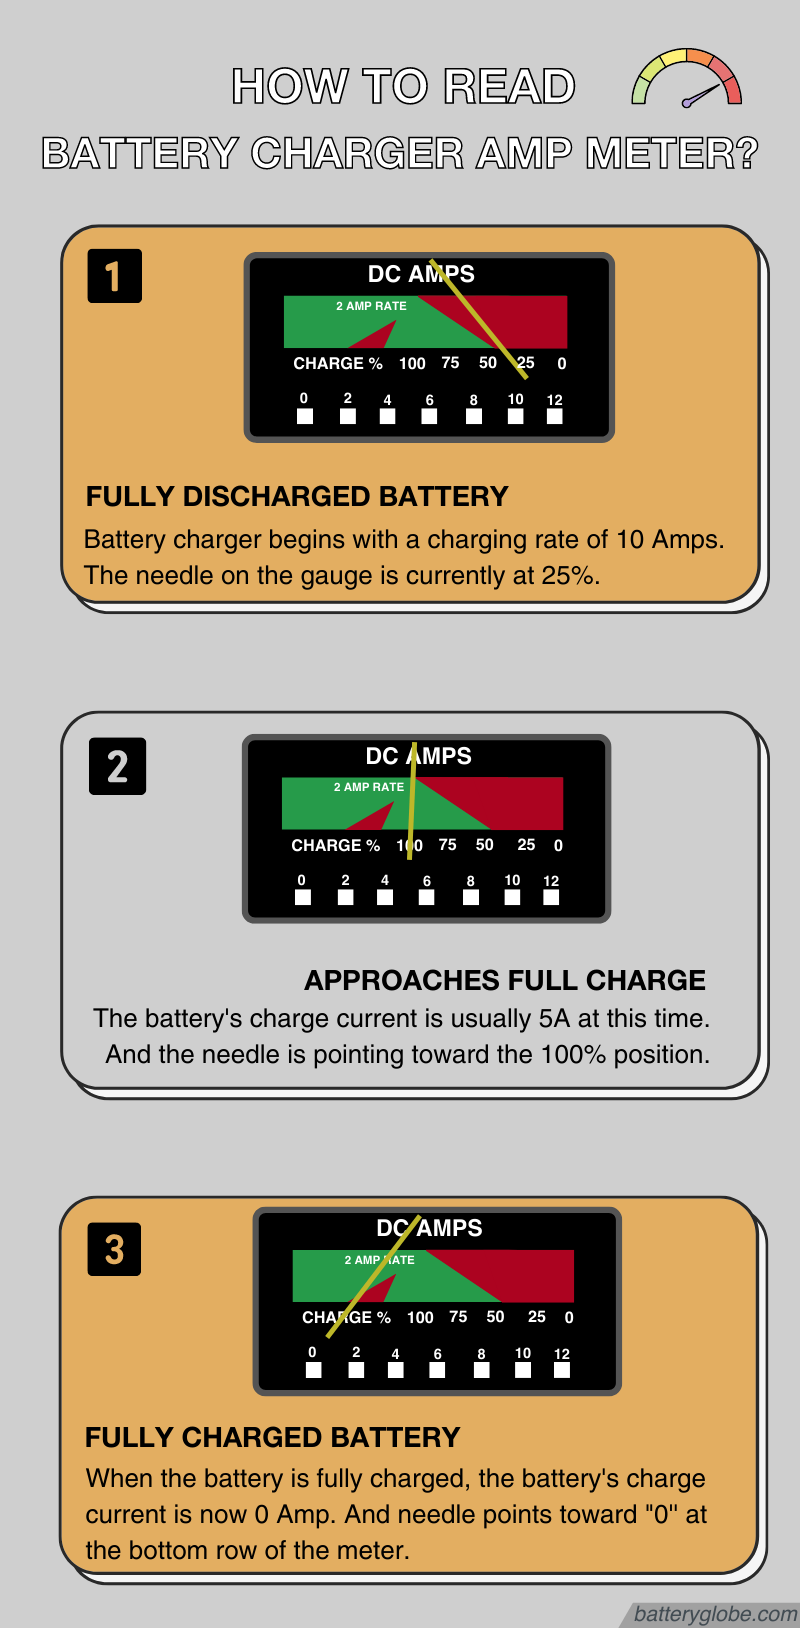
How do you read a battery charger amp meter?
After knowing the meanings of all parameters on the amp meter, you’ll find it easy to read a battery charger ammeter. Follow the detailed guide below:
How Do You Know When A Battery Is Charged On A Battery Charger?
When you first connect and switch on the charger, the needle will move sharply to the right.
After a few seconds, you will see the needle gradually move to the left. It will settle at a steady charging point, showing the amps flowing. This is a good sign that the charger is working.
How To Tell When A Battery Is Fully Charged On A Battery Charger?
The battery charger reads 0 amps
When the battery is fully charged, the battery’s charge current is now 0 Amp. And needle points toward “0” at the bottom row of the meter.
On the 12 amp charging setting: The needle will settle at around 6 amps, or just under. This is showing that the battery is fully charged.
On the 2 amp setting: The needle will settle near the end of the small red triangle when fully charged.
The needle will settle at around half the input setting you selected when the battery is full. On a 12 amp setting, the needle will show around 6 amps when the battery is charged.
FULL CHARGE green LED glows
The FULL CHARGE green LED also lights up to indicate that charging has been completed.
The below video will show you how to read a battery charger gauge in 1 minute!
Problems When Reading a Battery Charger Gauge
Battery charger needle jumping
- Poor connection: If the charger clips are not making a good connection to the terminals, this may occur.
- Defective battery: A battery that has become fully discharged or has some internal defects may cause this.
Battery charger needle not moving
1. Charger amp meter fault
To eliminate a fault with your charger, connect it to a known good battery. If it shows the same problem, it’s most likely a fault with your charger.
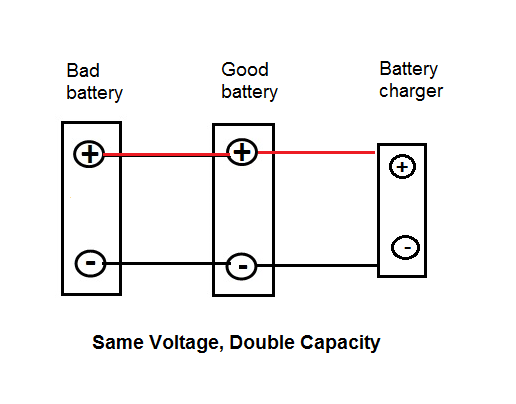
2. Battery charge is too low
Standard battery chargers will not work on a completely flat battery. Even modern trickle chargers with maintenance mode can struggle.
But there is a way around this. You can place another battery that has a good charge, in parallel with the bad battery.
Connect the two batteries together using jumper cables, positive to positive and negative to negative. Exactly the same as jump-starting a car. Now connect the charger. The bad battery should now be able to take a charge.
3. Dirty battery terminals
A car battery can get covered in a lot of dirt, and battery terminals can corrode. If the battery is not charging, then check the terminals first. Clean them and try again.
4. The amp meter needle is stuck
Mechanical needles can be prone to sticking, especially if the charger is old. Gently tap the meter and see if it moves.
5. Your AC outlet is faulty
The power supply from the AC outlet must be good for the charger to work. You can check this by plugging in another electrical item such as a lamp.
Conclusion
Many people don’t have a clue how to read the meter on their battery charger. Hopefully, this short guide has given you a sign of how useful the meter is.
Knowing how to read a battery charger amp meter is useful in many ways. Not only can it show the condition of your battery, but it can also help to diagnose charging issues.
So next time you are charging your battery, take a little time to look at the charger’s amp meter.