Spring has arrived, so you pull your riding mower out of the garage for the season’s first cut. But the riding lawn mower won’t start, no clicking coming from the engine or even noise.
The most common reason for this is a flat battery. Try charging the battery first and replacing it if required.
But if the battery isn’t the problem, what can you check and fix to get your riding lawn mower going? Our brief article explores the most common faults and fixes.
Safety Features
Most riding lawn mowers have several safety features. These prevent the engine from starting unless a set of conditions are met:
- Parking brake: Ensure the parking brake is fully engaged. This may be your foot brake.
- Blade control: The blade control handle should be in the off or stop position.
- Seat cutout: Most riding mowers will have a simple cutout switch on the seat.
Your particular model or brand of riding mower may have additional safety features. So make sure you check those as well.
Wiring and Connections
Like any internal combustion engine, the starter motor needs a good connection to the battery.
Inspect all connections on the starter motor, solenoid, ignition switch, and battery. Clean off any corrosion using a wire brush and make sure the connections are tight.
Don’t forget to check the grounding points as well. These are just as important as the connection to the battery.
Put a small amount of grease on all connections or use liquid electrical tape. This will help to prevent corrosion in the future.
Check the starter motor bolts are tight. If not, the starter can move and not engage correctly.
See the best Greases For Battery Connections here:

Permatex 22058 Dielectric Grease

Mission Automotive Dielectric Grease

POR-15 40909 Corrosion Protecting Gel
Bad Battery
If you turn the ignition key on your riding mower, and nothing happens, your battery could be dead. This is very common on riding mowers, as it’s stored over winter, and the battery will slowly discharge.
Measure the battery voltage using a multimeter:
- If it is below 12V, then try charging it and trying to start the mower again. You can also jump-start the riding mower engine with another 12V battery from your car, perhaps.
- If you try charging your battery but it still does not work, your mower may need a new battery.
Find purchasing options for Riding Lawn Mower Replacement Battery here:
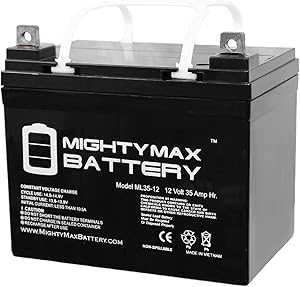
Mighty Max 35AH Battery

Universal Power 35AH Battery
Check All Safety Switches
Each safety switch will make and break an electrical connection if operating correctly. You can check this with a multimeter, but first, you need to locate the switches.
Position of Safety Switches
- Brake switch: The foot brake pedal most often operates the brake safety switch. It is sometimes difficult to access quickly, being below the blade deck of the riding mower.
- Blade Switch: The blade control lever operates the blade switch. Its position will vary, with some near the steering wheel and others mounted on the blade deck.
How to Check Safety Switches Step-by-step
- Find the switch and remove it from the riding mower for easy access.
- Using a multimeter, test for continuity between the connectors on the switch. Use the tone-setting on the multimeter, so you can hear when it is a short circuit.
- If the switch has four connectors: One pair will have continuity with the button depressed. The other pair will have continuity with the button released.
- If the switch has just two connectors: depressing the button will change between open and short circuit on the multimeter.
As a temporary measure only, it is possible to bypass the safety switch. This is useful if it’s complicated to remove the switch or as an additional test.
- Find the switch and disconnect the plug.
- Using a short jump lead, connect the terminals of the plug together.
- Now try to start the riding mower engine.
- If the plug has four connectors, you may need to try both pairs of connectors.
- If the engine starts, you know the switch is the problem.
Remember, this is only a temporary measure for testing. Bypassing the safety switch permanently is very dangerous.
Switch designs vary between manufacturers, but this short video on testing safety switches will help.
Bad Starter Solenoid
If you have a good battery, but nothing happens when you turn the ignition key, there could be a problem with your solenoid.
The solenoid is easy to check. You’ll need a 12V battery and a multimeter.
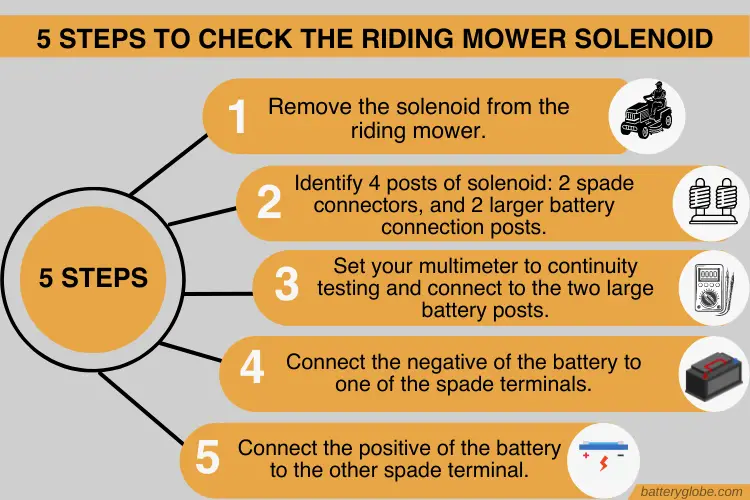
1. Remove the solenoid from the riding mower.
2. Most solenoids have four posts: 2 spade connectors to operate it and 2 larger battery connection posts.
3. Set your multimeter to continuity testing and connect it to the two large battery posts.
4. Connect the negative of the battery to one of the spade terminals.
5. Now connect the positive of the battery to the other spade terminal:
- You should hear a click as the solenoid operates.
- The multimeter should show continuity/short circuit.
Take a look at this video on testing a solenoid (from time 5:50) for a more detailed description.
Other Reasons Causing Starting Problems
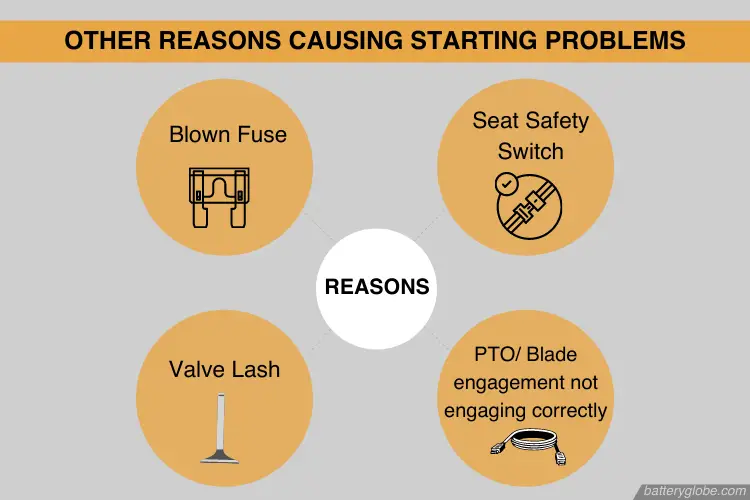
Blown Fuse
There will be some fuses on the riding mower. Either check them with a continuity tester or replace them.
Seat Safety Switch
The seat safety switch is a straightforward device. With no one sitting on the riding mower, the switch will be short circuit. With weight on the seat, the switch will make an open circuit.
It’s easy to test by merely disconnecting the plug and trying to start the engine.
Valve Lash
All four-stroke engines use a valve system of some kind to operate. The valves must be set correctly for the engine to run correctly.
The valve lash is the gap between the valve rod and the operating cam. If this becomes too large, the valves will not operate correctly and prevent the engine from running.
How to check the valve lash is beyond the scope of this short article. It is something a home mechanic can do if you have the tools.
PTO/ Blade Engagement Not Engaging Correctly
The PTO/Blade engagement lever uses a notched steel rack to hold it in place. Over time, the teeth on the rack wear down, or a notch develops on the lever. This causes the lever not to engage the safety switch correctly, preventing the engine from starting.
This short video on the PTO lever explains it very clearly.